
Windows 10's Task View is a system that provides an experience to work more efficiently with multiple apps. with it you can quickly jump between open applications and spread projects onto separate desktops to stay focus on a particular task.
Additionally, starting with the April 2018 Update, Task View also introduces Timeline, which works like a time machine allowing you to resume activities that you're working in the past on the same or different PC using a Microsoft account.
In this Windows 10 guide, we'll walk you through the steps to get started with Task View to improve your multitasking experience when working with multiple apps and projects.
How to get started with Task View
Task View was originally designed to make it easier to see and switch quickly between running applications. However, the feature has been evolving ever since it was first introduced, and now, you can also resume activities you were working in the past, as well as use virtual desktops to organize related tasks.
Here's everything you need to know to multitask more efficiently on Windows 10's Task View.
Using task switcher
Task View primary function is to provide an experience to quickly switch between running applications.
Accessing Task View
On Windows 10 there are at least two ways to access the experience. You can click the Task View button in the taskbar, and you can use the Windows key + Tab keyboard shortcut.
Quick Tip: If you don't see the button, right-click the taskbar, and select the Show Task View button option.

Working with Task View
Inside Task View, your running applications will be listed in the middle of the screen, which you can click to switch to a particular app quickly.

You can also right-click an app to access its context menu to perform some common tasks, including the ability to snap the app to the left or right of the screen, move it to a different virtual desktop or show windows across desktops, and an option to quickly close the application.

Windows key + Tab vs. Alt + Tab
Since the addition of virtual desktops, there's a slight difference between the Windows key + Tab and Alt + Tab keyboard shortcuts. While both shortcuts access a list of your running applications, the Windows key + Tab only shows the applications running on a particular desktop. It also exposes an interface that includes the controls to manage virtual desktops, and a list of all your Timeline activities.

On the other hand, when using the Alt + Tab keyboard shortcut, you're accessing a list of all your running applications no matter in which virtual desktop they're running. In addition, you can keep pressing the shortcut to cycle through apps, and when you land on a particular app, it'll take you to that application on the desktop that's running.
Using virtual desktops
Virtual desktops is an easy-to-use feature in Task View designed to help you organize related activities into groups.
Using this feature, you can create multiple environments that each can run different apps keeping your focus on a particular project. Typically, this feature comes in handy to keep work tasks separate from your personal tasks, or when multitasking between different activities, and you don't have a multi-monitor setup.
Accessing virtual desktops
To access the experience, click the Task view button in the taskbar or use the Windows key + Tab keyboard shortcut.
While in Task View, virtual desktops will appear a the top of the experience.

If you're using multiple desktops, a preview will appear for each virtual desktop, which you can hover with the mouse to get a quick pick of the apps running in a particular virtual environment.
Working with virtual desktops
On Windows 10, you can create as many desktops as you need, the only thing you need to do to start is to click the New desktop button.

You can also use the Windows key + Ctrl + D keyboard shortcut to create a new desktop even faster.
If you want to remove a desktop, simply open Task View, and click the Close (X) button in the top-right corner of the virtual desktop. (Any running application will automatically move over to your primary desktop.)
Swithching between desktops, just click the thumbnail of the virtual environment you want to use.

It's also possible to move quickly between desktops using the Windows key + Ctrl + Left or Windows key + Ctrl + Right keyboard shortcuts.
If you need to move apps between virtual environments, right-click the app, and select Move to, and pick the desktop you want to move the app.

Alternatively, you can drag and drop a running application to the virtual desktop you want. You can even drop the app into the plus (+) button, in which case, it'll create a new virtual desktop with the app.
Although virtual desktops is a feature to separate activities into groups, sometimes, you need a particular app to be available on all desktops.
If you need to show an app or a window on all desktops, while in Task View, right-click the app, and select one of two options:
- Show this window on all desktops.
- Show windows from this app on all desktops.

Virtual desktops settings
While virtual desktops is a simple feature, using the Settings app, you can customize a few options to get the most out of the experience.
- Open Settings.
- Click on Devices.
- Click on Multitasking.

Under the "Virtual desktops" section, you'll notice two drop-down menus that allow you to decide whether the taskbar and pressing the "Alt + Tab" keyboard shortcut should include the open windows only on the virtual desktop that they're on, or on all desktops.
Using Timeline
Timeline is a feature that leverages the Microsoft's cloud infrastructure allowing you to pick up activities you're working in the past within the Task View experience.
Activities can include articles you're reading in Microsoft Edge, an Office document, or task from an app that you started on your computer, or from another device connected with the same Microsoft account, including on your Android or iOS device.
Accessing Timeline
To access Timeline, click the Task view button in the taskbar or use the Windows key + Tab keyboard shortcut.
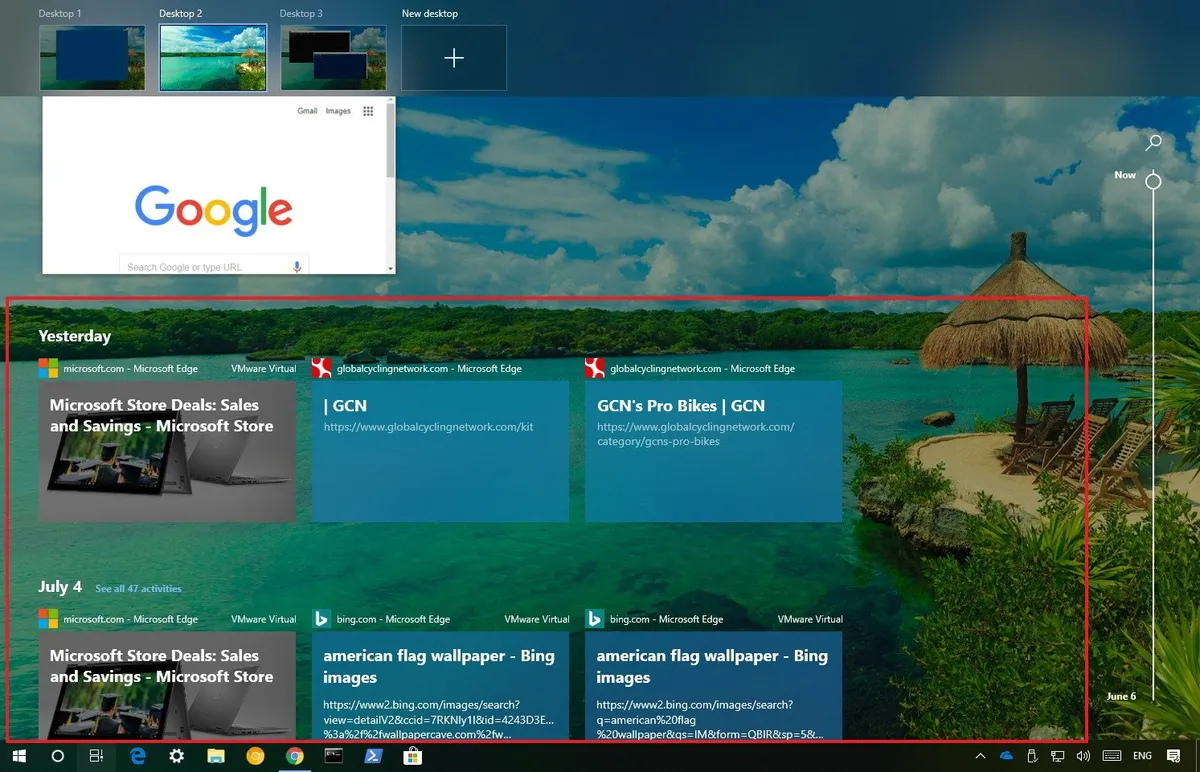
While in Task View, Timeline will appear a the bottom of the screen.
Working with Timeline
The experience organizes your previous activities using deep-links to a specific piece of content within an app to make it easier to pick up right where you left off.
Items are group by date, and each day offers two rows of activities, but the number of items will mostly depend on the size of your screen real estate.
To resume a task, click the item from the list. If the activity you want to resume isn't listed, you can click the See all button to access a full day of activities.

In the page, the scrollbar on the right helps you to dig through the items. Also, you can use the search button on the top-right to quickly find a particular activity using keywords.

If you need to delete activities, you can always right-click an item and select the Remove option. Or you can also select the Clear all from option to remove all the activities for a particular day.

As a result of Timeline being a feature that works across devices, in order to differentiate activities originated from another device, you'll notice that activities will include the name of the computer that started the task.
Customizing Timeline
Using the Settings app is possible to enable, disable, and customize various aspects and functionalities of Timeline.
- Open Settings.
- Click on Privacy.
- Click on Activity history.

Under the "Activity history" section, you'll find two options:
- Let Windows collect my activities from this PC: This option is enabled by default, and you must keep it enabled for Timeline to work.
- Let Windows sync my activities from this PC to the cloud: This option is disabled by default, and you must turn it on in order to access up to 30 days of activities, and tasks from other devices. Otherwise, Windows 10 will only collect four days worth of activities.
On Task View, Timeline lists the activities from all your Microsoft accounts connected to your device. If you use multiple accounts, under Show activities from accounts section, you can decide which activities to show.
While disabling all accounts from showing activities will disable Timeline in Task View, unless you clear the Let Windows collect my activities from this PC and Let Windows sync my activities from this PC to the cloud options, Windows 10 will continue to collect and share your activities to your other devices.
You can learn even more about Timeline in this guide.
More Windows 10 resources
For more helpful articles, coverage, and answers to common questions about Windows 10, visit the following resources:
- Windows 10 on Windows Central – All you need to know
- Windows 10 help, tips, and tricks
- Windows 10 forums on Windows Central

